Tuesday 26 February 2013

Float or Sink Experiment - Salt Water Egg


Float or Sink Experiment - Salt Water Egg


Steps :  

1. Fill both bowls with warm tap water.

2. Add a few tablespoons of salt to one of the bowls of water and stir it really well, until the salt has dissolved in the water.

3. Carefully place a egg in each bowl.

4. One egg will float and the other will sink.


Both bowls are filled with warm tap water. A few tablespoons of salt are added to one of the bowls of water and is stired very well umtil the salt has dissolved in the water.An egg is careffully placed in each bowl. One egg will float and the other will sink. 

TOOTHPASTE EXPERIMENT WITH EGGS

STEP 1
Wash and dry two eggs. Coat the one with a toothpaste containing fluoride. Apply the toothpaste in a coat at least ¼ inch thick and fill in any air bubbles.

Step 2
Use a spoon to place each egg in the bottom of a glass and pour white vinegar into the glasses, deep enough to cover the eggs.Leave the eggs in the vinegar for 7 hours.

Step 3
Bubbles will form on the shell of the unprotected egg while it is soaking in the vinegar. This is a result of the calcium dioxide gas formed by the acid in the vinegar reacting with the calcium carbonate in the eggshell and dissolving it.


Two eggs are washed and dried. The one is coated with a toothpaste containing fluoride. The toothpaste is applied in a coat at least 1/4 inch thick and filled in any air bubbles. A spoon is used to placed each egg in the bottom of a glass and poured white vinegar into the glasses,  is deepen enough to cover the eggs. The eggs are left in the vinegar for 7 hours. Bubbles will form on the shell of the unprotected egg while it is soaking in the vinegar. This is a result of the calcium dioxide gas formed by the acid in the vinegar reacting with the calcium carbonate in the eggshell and dissolving it.

Glowing Water

Instructions:
  1. Break a highlighter pen.
  2. Remove the felt.
  3. Soak it in a small amount of tonic water for a few minutes.
  4. Turn off the light.
  5. Turn on the black light near your water.

 A highlighter pen is broken. The felt is removed. Then it is soaked into a small amount of tonic water for a few minutes. The light is turned off. Turn on the black light near the water.


experiment instructions


Instructions:
  1. Wrap the white paper around one of the glasses using an elastic band or sellotape to hold it on.
  2. Do the same with the black paper and the other glass.
  3. Fill the glasses with the exact same amount of water.
  4. Leave the glasses out in the sun for a couple of hours before returning to measure the temperature of the water in each.


The white paper is wrapped around one of the glasses using an elastic band or sellotape to hold it on. The black paper and other glass  are done the same.The glasses are filled with the exact same amount of water. The glasses are left out in the sun for a couple of hours before the temperature of the water is measured.


Experiment (Float an egg in a glass)

Instructions:
1. Take two glasses of the same size.
2. Pour cold water into both of them until the top.
3. Then take two cooked eggs at the same size.
4. Put three or four tablespoons of salt into the second glass.
5. Stir salt and water well.
6. Put an egg in each glass.
7. Probably the egg in the second glass floats.
8. If not you could try again and put more salt in the glass.

Two glasses are taken of the same size.One of them is poured with cold water until the top.Then two cooked eggs of the same size are taken.Three or four tablespoons of salt are put into the second glass.The salt is stirred well with water.An egg is put in each glass.Probably the egg in the second glass is floated.In case it doesn't,you could add some salt in the second glass.

Make an electromagnet

MAKE AN ELECRTOMAGNET

You will need:
1)A large iron nail (about 3 inches).
2)About 3 feet of thin coated copper wire.
3)A fresh D size battery.
4)Some paper clips or other small magnetic objects.

Instructions:
1)Leave about 8 inches of wire loose at one end and wrap most of the rest of the wire around the nail. Try not to overlap the wires.

2)Cut the wire (if needed) so that there is about another 8 inches loose at the other end too.

3)Remove about an inch of the plastic coating from both ends of the wire and attach the one wire to one end of a battery and the other wire to the other end of the battery. See picture below. (It is best to tape the wires to the battery - be careful though, the wire could get very hot!

4)Now you have an electromagnet. Put the point of the nail near a few paper clips and it should pick them up!

Description:
At first, 8 inches of wire are left loose at one end and most of the rest of the wire is wrapped around the nail.
Try not to overlap the wires.Next, the wire,if needed, is cut so that there is about another 8 inches loose at the other end too.Furthermore, the plastic coating is removed an inch from both ends of the wire and the last one is attached to one end of the battery and the other one is attached to the other end of the battery. (See the picture above.) It is better to tape the wires to the battery,however, be careful,the wire could get really hot. Finally, the electromagnet is made.The point of the nail is put near a few paper clips,which picks them up!

The Elephant's Toothpaste Experiment

The Elephant's Toothpaste Experiment


  • Carefully pour 1/2 cup 20-volume hydrogen peroxide into a plastic soda bottle.
  • Add 8 drops of food coloring into the bottle.
  • Add about 1 tablespoon of liquid dish soap into the bottle.
  • Swish the bottle around a bit to mix it.
  • In a separate small cup, combine warm water and 1 Tablespoon of dry yeast together.
  • Mix for about 30 seconds.
  • Pour the yeast water mixture into the bottle.


1/2 cup 20-volume hydrogen peroxide is carefully poured into a plastic soda bottle. 8 drops of food coloring are added into the bottle. 1 tablespoon of liquid dish soap are added into it as well. The bottle is swished around a bit in order for the mixture to be mixed. Warm water and 1 Tablespoon of dry yeast are combined together in a separate small cup and they're mixed together for about 30 seconds. The yeast water mixture is poured into the bottle. 


Experiment # 1: How to Tell If An Egg is Cooked


  1. Spin the egg on its side very fast.
  2. Make it stop by pressing on it with your finger.
  3. Remove your finger quickly.
  4. You will see that a raw egg will continue to spin.
PRESENT PASSIVE VOICE:

The egg is spinned on its side very fast. Then the egg is made to stop by pressing on it with your finger. Next your finger is removed quickly. At the end a raw egg will continue to spin.

                         Use a Straw to Stab a Potato

    Instraction:
  1. Pour water into the plastic bottle until it is around one quarter full (you might want to use a funnel when filling the bottle so you don't spill anything).
  2. Pour in vegetable oil until the bottle is nearly full.
  3. Wait until the oil and water have separated.
  4. Add around a dozen drops of food coloring to the bottle (choose any color you like).
  5. Watch as the food coloring falls through the oil and mixes with the water.
  6. Cut an Alka-Seltzer tablet into smaller pieces (around 5 or 6) and drop one of them into the bottle, things should start getting a little crazy, just like a real lava lamp!
  7. When the bubbling stops, add another piece of Alka-Seltzer and enjoy the show!
      
     Wateri s poored into the plastic bottle until it is around one quarter full.
     Vegetable oil is poured in until the bottle is nearly full.
     Wait until the oil and water have separated.
       

Inside-out baloon Expirement


1. Put some water and some ice into your pot. Fill it about half full and give it at least two minutes to get cold.
2. Get the water from your faucet to be as hot as possible.
3. Put about 3 inches of hot water into the bottle and swish it around.
4. Now, as fast as you can, pour out the water, put the balloon on the top of the bottle, and put the bottle into the pot with the cold water.

The balloon should shrink and be pulled into the 2 liter bottle.

Passive:
Some water and some ice is put into the pot.It must be filled half full and given at least two minutes to get cold.The water from the fauset is gotten and been as hot as possible.About 3 inches of hot water must be putted into the bottle and swished it around.Then as fast you can the water is poured out,the ballon put on the top of the bottle an the bottle put into the pot with the cold water.

Rise egg Rise

An egg is placed on a glass of three quarters full of water.The force of the weight make the egg sink at the bottom of the glass.Salt is put to the glass and stir.The egg no longer is sinked but actually floats.The density of the water is increased with the salt and is created a buoyancy force,acts upwards.


1. Fill the glass three quarters full of water.
2. Put the egg into the water, it should sink (if it doesn’t grab a different egg).
3. Now put in salt and stir.
4. Keep putting in salt and stirring until the egg no longer sinks but actually
floats.
5. If you’re lucky, you may reach a point where the egg neither sinks nor
floats but hangs in the middle.


    MAKE AN EGG FLOAT  IN SALT WATER


     INSTRUCTION

    1   Pour water into the glass until it is about half full.
    2   Stir in lots of salt (about 6 tablespoons).
    3   Carefully pour in plain water until the glass is nearly full (be careful to not disturb or mix the salty water with the plain water).
    4   Gently lower the egg into the water and watch what happens.


The water is poured into the glass until it is about half full.  Lots of salt is stirred in. Water is poured carefully until the glass is nearly full. The egg is gently lowered. and watch what happens

Oil and Water

1. Pour the water into the glass.
2. Add a couple of drops of food colouring and mix.
3. Add the oil.
4. Cover the glass with plastic wrap or your hand.
5. Shake the glass so the two liquids are thoroughly mixed.
6. Set the glass down and watch what happens.

The water is poured into the glass and a couple of drops of food colouring are added and mixed. Then, the oil is added and with a plastic or with a hand the glass is covered. The glass with liquids are shaked and it is set down.
We watched that the oil is less dense than the water and so is on top.

Tight Squeeze


1) Hold your hand open.

2) Put an egg in the palm of your hand.

3) Close your fingers around the egg.

4) Put your hand into a plastic bag and hold the bag closed around your wrist.

5) With the bag held around your wrist, squeeze the egg as hard as you can.


Your hand must held open.  An egg is put in the palm of your hand.  Your fingers are closed around the egg.  Your hand is put into a plastic bag and the bag is closed around your wrist.  With the bag held around your wrist, the egg is squeezed as hard as you can.


Periklis Georgiou

Color Changing Milk

Color Changing Milk

1. Pour enough milk in the plate to completely cover the botton
2. Add one drop of each of the four colors
3. Keep the drops close together in the center of the plate of milk
4. Place a drop of liquid dish soap on the other end of the cotton swab
5. Hold it there for 10 and 15 seconds

Enough milk is poured in the plate to completely cover the botton.  One drop is added of each of the four colors. The drops are kept close together in the center of the plate of milk.  A drop of liquid dish soap is placed on the other end of the cotton swab.  It is holded there for 10 and 15 seconds. In the end of experiment the color are burst!!

TRY SOME LAVA IN A CUP
  1. Fill the glass about 3/4 full of water .
  2. Add about 5 drops of food coloring.
  3. Slowly pour the vegetable oil into the glass. See how the oil floats on top.
  4. Sprinkle the salt on top of the oil.
  5. Watch blobs of lava move up and down in the glass!
  6. If you liked that, add another teaspoon of salt to keep the effect going.
A glass is filled about 3/4 full of water. Five drops of food coloring is added. The vegetable oil is poured slowly into the glass. Is seen how the oil floats on top. The salt is sprinkled  on top of the oil. Is watched blobs of lava move up and down in the glass. If you liked that another teaspoon of salt is added to keep the effect going.

Rise Egg Rise


1. Fill the glass three quarters full of water.
2. Put an uncooked egg into the water.
3. Put salt in the water.
4. Stirring until the egg no longer sinks but actually
    floats.
5.Reach a point where the egg neither sinks nor
   floats but hangs in the middle.


Three quarters full of water is filled in a glass. Then, an uncooked egg and salt are put into the water.Later, the mixure is stirred until the egg no longer is sinked but actually it is floated. The  point where the egg neither is sinked nor is floated but it is hanged  in the middle, is reached.


MAKE A PAPERCLIP FLOAT


  1. Fill the bowl with water.
  2. Tear a piece of tissue paper about half the size of a dollar bill.
  3. Gently drop the tissue flat onto the surface of the water.
  4. Gently place a dry paper clip flat onto the tissue (try not to touch the water or the tissue).
  5. Use the eraser end of the pencil to carefully poke the tissue (not the paper clip) until the tissue sinks.
   The bowl is filled with water. A piece of tissue paper is teared about half the size of a dollar bill. The tissue flat is gently dropped onto the surface of the water.  A dry paper clip float is gently placed onto the tissue (try not to touch the water or the tissue). The eraser end of the pencil is carefully used to poke the tissue (not the paper clip) until the tissue is sinked.


Lava Lamp


1. Fill the water bottle up till it is two thirds full.
2. Add 2-3 drops of food colouring to the water.
3. Pour in a small quantity of oil, just enough to form about a 2cm layer on top of the water.
4. Sprinkle a few pinches of salt onto the oil and watch what happens.
5. Keep adding salt to make your experiment last longer.

Passive Voice
1. A bottle is filled up until it is two thirds full
2. 2-3 drops of food colouring is added to the water
3. A small quanity of oi is poured, just enough for a 2cm layer to be formed on top of the water.
4. A few pinches of salt are sprinkled onto the oil as their happenings are being watched :)
5. Salt is kept adding so that the experiment lasts longer


how to make plastic milk-experiment

  1. Heat up the milk until it is hot, but not boiling
  2. Pour the milk into the bowl
  3. Add the vinegar to the milk and stir it up with a spoon for about a minute
  4. Pour the milk through the strainer into the sink - careful it may be hot!
  5. Rinse the blobs off in water while you press them together .

The milk is heated up until is hot,but not boiling.
The milk is poured into the bowl.
The vinegar is added to to the milk and a spoon is stirred up for about a minute.
The milk is poured through the strainer into the sink but careful it may be hot!.
The blobs are rinsed in water while you press them together.


Spinning Ball Experiment

1. Place the ball on top of the table
2.  Place the jar over the ball so that the ball is inside the mouth of the canning jar.
3.Now see if you can lift the ball up from the table top without touching the ball or tipping over the jar.
4. Start spinning the jar around in a circular motion (keeping it on the table).
5. Once the ball starts spinning inside the jar lift it from the table top.
6. The ball is lifted from the table and will continue to spin inside the jar until it loses is speed.


The ball is placed on top of the table. The jar is placed over the ball so that the ball is inside the mouth of the canning jar. The ball is lift up from the table top without touching the ball or tipping over the jar. The jar is spined around in a circular motion. The jar is lift from the table top once the ball starts spinning inside the jar . The ball is lifted from the table and will continue to spin inside the jar until it loses is speed.

Calculating the volume of an object

Insturctions:
1. Fill a cup of water completely
2. Place the cup in a bigger cup with measurements
3. Place the object whose volume you wish to calculate into the cup with the water
4. Measure the volume of the water that leaked into the other cup because of the overflow

A cup is filled completely with water. The cup is placed in a bigger cup. An object is place into the cup of water. The water is dislocated by the object and is leaked in the cup.

Describing experiments


Write a list of instructions for carrying out an experiment. Then describe the experiment using the present passive.


Tuesday 19 February 2013

CAM


A cam is a rotating or sliding piece in a mechanical linkage used especially in trasforming rotary motion or vice-versa. It is often a part of a rotating whell or shaft (e.g. a cylinder with an irregular shape) that strikes a lever at one or more points on its circular path. The cam is used to deliver pulses of power to a steam hammer, for example, or an eccentric disc or other shape that produces a smooth reciprocating motion in the follower.

Piston

A piston is a component of reciprocating engines.There are several categories that we can use the piston,for example, the piston in an air compressor takes the mechanical energy applied to the crank shaft and uses it to compress the fluid that it was designed to compress. Piston plays a vital role in industry.

BICYCLE


BICYCLE
Bicycle is a mode of transportation. Many of people using bycicles to go to work and have an afternoon stroll! Bicycle is a human powered, having two wheels attached to a frame, one behind the other. Bicycle is doing a rotary motion which transfers motion energy to the wheels through a chain.


mechanisms

SCISSORS

Scissors are very useful tools in every day life. They are small ones and big ones for different uses. Every scissor has two blades which are very sharp and it can hurts you if you are not careful. Scissors are mostly used for cutting  thin materials ,such as paper,plastic,cloth. Furthermore , they can be use to cut hair or food. They are able to cut anything linear and rotary as well.

Mechanism (Piston)

A mechanism is a device designed to transform input forces and movement into output forces and movement. A mechanism which is used in cars, trucks and motorcycles  is piston. In an engine, its purpose is to transfer force from expanding gas in the cylinder to the crankshaft. Inside the cylinder it does a reciprocating movement and as a result it burns the gas to produce some movement. Piston plays a vital role in industry.


Transmission

A mechanism that I find very useful is the one used in the transmission of cars. To put it simply, they convert the motion of the engine into the rotary motion of the wheels by using various gears and gear trains. In this way, the output power of the car is controlled more easily by the driver, who does simple motions in order to change gears. Each set of gears has its speed limits, so the driver or a computer system must choose the ideal gear every time.

Mechanical Clock

The mechanism that I choose is a mechanical clock. It is very useful in our everyday life. Mechanical clocks consist by two parts, a mainspring and a pendulum. The mainspring gives the energy to turn the gears; as a result, the hands move. Τhe pendulum keeps time and ensures that the gears move at the right pace, second by second. Some mechanical clocks have weights that pull the gears at the right pace instead of mainsprings. In conclusion mechanical clock do not need electricity to operate.

Light Switch

A light switch is a switch which is most commonly used to operate electric lights. It comes in a variation of designs such as the push button or the toggle switch. The most common light switch is the toggle switch as it is the switch we mainly see in our homes or daily life. By moving the switch (the toggle for example) the switch will allow an electric current to go through it so it reaches the light bulb. The switch handle does not control the contacts directly, but through an intermediate arrangement of springs and levers. Turning the handle does not initially cause any motion of the contacts, which in fact continue to be positively held open by the force of the spring. Turning the handle gradually stretches the spring. When the mechanism passes over the center point, the spring energy is released and the spring, rather than the handle, drives the contacts rapidly and forcibly to the closed position with an audible "snapping" sound. The snap-action switch is a mechanical example of negative resistance.


suspension mechanism

Suspension mechanism is the mechanism used in cars which uses springs,shock absorbers and linkages to connect with the wheels and have relative motion.While those mechanisms behave to the handling of a car in the road ,they also are in charge for the brakes.As a result the vehicle are in a safety and the driver and the passengers are more comfortable in all the route,even at the sites were bumps or road anomaly is detected. Another objective of a suspension mechanism it is so that it keeps the wheel at the road surface.The suspension also protects the car and any carriage or luggage from being damaged or scratched.The front suspension mechanism from those at the back of the vehicle could be different.

Ifigenia Aslanidou-Pistons

PISTONS

A piston is part of an engine block, which consists of a series of long hollow channels called cylinders, each one containing one piston. As the crankshaft spins, the pistons move up and down.A fuel mixture enters the engine on the downward motion of a piston, gets compressed by its upward motion, and at the top it gets pushed between the top of the piston and the top of the engine cylinder, preparing the mixture for ignition by the spark plugs.


Hinge

 Προβολή εικόνας πλήρους μεγέθους

Hinge is product that we meet in our lifes every day. Hinges are also made of metal. Hinge is a type of bearing that connect twoBarrel hinge solid objects which allowing a limited angle of rotation.

Scissors

Between all mechanisms that i know i choose one that i like most, scissors. That beacause scissors are very usuful tools and how it works is very simple. First of all this mechamism have two blades which are very sharp so we have to be carefull when we use it. The blades are set up so that when you squeeze the handles, the sharp edges meet each other as a result to cut the paper, or fabric, that is between them. We have all try to use scissors for any uses. For example to cut a paper, a fabric to make clothes, hair. You can find scissors in any bookshop or supermarket, depends the use that you want it.
Escalator mechanisms 

Escalator is a michanisms that is used between floors and help people moving between them without stress themselves by using the stairs.


Bicycle

A mechanism i find useful is the bicycle. The bicycle is the cheapest means of transport, so many people use bicycle. It works by applying force to the petals while doing a rotary motion which gets transfered to the wheels through the chain.

Window opener


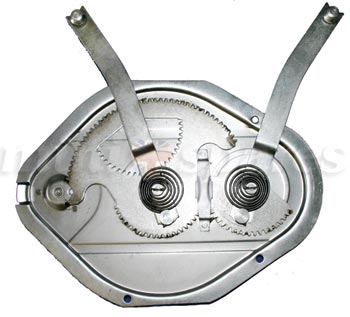
I believe that the window opening-closing mechanism is a very important and useful mechanism for our everyday life. It is a simple mechanism that converts the rotary motion of our hand into the linear motion required to open or to close the window. It consists from two gears which are revolved depending of the power that we give them by our hand. Then, they move a bar that batten the glass of the window.


mechanisms

The scissors are hand-operated cutting instruments and it's very useful mechanism!Scissors are used for cutting various thin materials, such as paer,   metal foil, thin plastic so if you are an engineener it's very useful.
there are many kinds of scissors. For examble plastic  and metalic scissors.As a result the scissors do an excellent job of cutting..!!!

piston

piston is a mechanism that goes up and down inside a cylinder as a result to push the fuel  into the cylinder as a result to burn and produce some kind of movement or motor. It is usually used in cars and trucks.For the construction of this mechanism ,it is using aluminium alloys and some other alloys so to make the material so to make it more harden.


Paper Trimmer

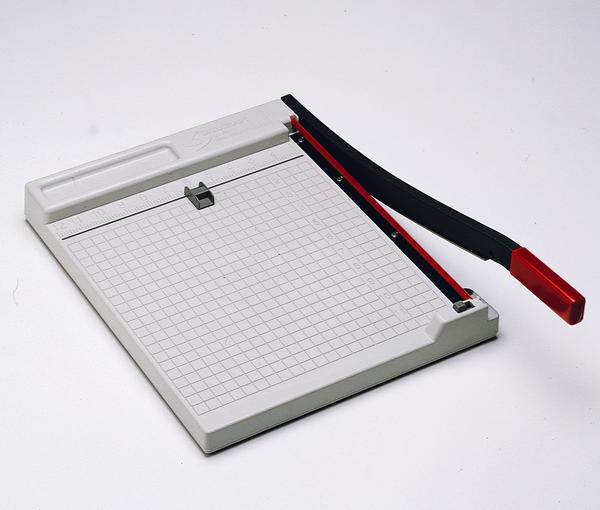
    The paper trimmer is a very useful mechanism especially if you are an engineer or an architecture. The linear movement of a paper trimmer helps you to cut paper in smaller size. This is very important when you have to design a tool, because you need a smaller piece of paper. Moreover, an architecture needs a bigger paper to design a whole house. Also, this mechanism is useful for people who study graphic design.

The clock


The clock it’s use the oscillation mechanism. It’s very important because it's keeping the mushier of the time correctly. In the clock we find a pendulum to move backwards and forwards in a specific amount of time so one move back and forward to be 1 sec. This move can easily change into rotation move to move the indicators of the clock.

Bicycle

A mechanism I find useful is the bicycle. It helps us move from one place to another fast and easily with minimal costs. In addition it makes a good exercise while traveling short distances without poluting the enviroment. It works by applying force on the petals and doing a rotary motion witch transfers motion energy to the wheels through a chain. The spin of the wheels prevents the bicycle from falling when it's moving. 
Cam and follower mechanisms
A cam and follower is formed by the direct contact of two specially shaped links. The driving link is called the cam  and the link that is driven through the direct contact of their surfaces is called the follower. The shape of the contacting surfaces of the camm and follower determines the movement of the mechanism. In general a cam follower mechanism's energy is transferred from cam to follower. The cam shaft is rotated and, according to the cam profile, the follower moves up and down.  The main benefit of this type of cam follower mechanism is that the follower moves a little bit and helps to rotate the cam 6 times more circumference length with 70% force!!!

                                                                File:Clean Energy Cheaper Than Coal Cam Follower Mechanism-Gif.gif

Mechanisms

worm and worm wheel

Choose a mechanism that you like and you find useful and describe it. Explain how it works, which type of motion is involved, and refer to its uses.You may illustrate your paragraph with an image of the mechanism.

Monday 18 February 2013

I study 6 courses per week in this semester. I study maths, which is 4.30 hours course, physics, 3 hours course, programming which is a 3 hours course and 1.30 of practical exercise. I also study science of materials that lasts 4.30 hours in a week, mechanical designing which is separated in two, 3 hours course, of both theory and practical exercise and of course  English for mechanical engeeneering, a 3 hours course.My favorite course is mechanical design because i like creating new ideas and support new plans of design.By the looks of it someone might just say that this is an exhausting routine because every class starts at 9 o' clock and the last finishes at 5 o' clock every day (except weekends). this makes classes feel more difficult and in some cases you feel so bored that you find it hard concentrate and the only thing that sticks in your mind is when are you going home and lay on the bed :)

Timetable

This semester I have a difficult timetable. Most of the time i start lessons at 9.00mm until 17.00pm. I do 6 lessons and that is the reason for the difficult timetable I have. The 6 lessons that I have is Maths,Physics,English for academical purposes,Autocad,science of materials and programming. The lesson that I like is Physics because the teacher leave us early. 

my timetable

This semester i have six subjects to complete until the end of it.Every class last for one hour and a half.I usually have a break after a class for about thirty minutes but there are some times that i have more time like one or two hours.My timetable includes physics,science of materials, English for academic purposes and design in computers(auto-cad).i have a total 20 hours classes every week. 

Timetable


Timetable

  This semester I have a busy timetable, with 24, 1 and a half hour courses every week. Usually the courses start at 9am and end at arround 5pm in the afternoon. The courses that I have are Maths, Physics, Material science, english, design and programming. Of all the days of the week monday is the busiest, I have 4 courses witch take 7 and a half hours with only half hour breaks in between.

My Timetable

Second semester is much difficult because the timetable is a bit tedious. My lessons start at 9 o' clock or at 10.30 and finish at 5 to 6 o' clock in the afternoon. This happens because I have 6 lessons. Monday is the worst day because I have 7.30 hours in class and just 1 hour break(two breaks of half an hour). Maths,Physics,English,Programming,Science of materials and Autocad are my 6 lessons. The lesson that I like and I believe that it is interesting is the Science of materials, because  it has to do with mechanical engineering and that is what i want to know about.

my timetable

    This semester my classes start at 9am every morning and finish at 5:30 pm except Friday, I start at 10:30 am. On Tuesday’s I finish at 2pm. My timetable includes Mathematics, Physics, Programming, English for academic purposes, Science of Materials and AutoCAD. All my classes are about one hour and a half except the AutoCAD which takes 3 hours. I have at least two breaks every day which I can relax and have a lunch. I believe that the most interesting lesson is the AutoCAD.

Sunday 17 February 2013


My weekly timetable this semester is very tiring. My lessons start at nine o'clock every day except from Friday which start at twelve o'clock. The lessons finish approximately at half past five every day. Most of the classes are one and a half hours long, and a few are three hours long. I have a lunch break at twelve o'clock every day except from Friday because my lessons start at twelve o'clock. This semester I have six different lessons.

My timetable

This semester i was given a difficult timetable because all days except friday i start lessons from 9 in the morning.The good thing is that my lessons are over before 6 in the afternoon except Wednesday.The subjects i study are Physics,Mathematics,Programming,Material science,English for mechanical engineers and Mechanical design.All the lessons last for one and a half hour except the Mechanical design that last for three hours but we have a fifteen minutes break that give us some rest.I also have a Physics lab every three weeks that we deliver it finished in a week with our comments.I think my timetable is difficult but we have to get used to it.

Saturday 16 February 2013

My timetable


My timetable starts every day at nine o'clock in the morning,except on Friday that I start at twelve o’clock and I usually finish at five o'clock in the afternoon. This semester my timetable includes Mathematics, Physics, Science of materials, English for Mechanical Engineer, Programming and Mechanical design with the help of Computer. The most of my subjects endure one hour and thirty minutes and we have a 15 minutes academic break, in which we can have our lunch and relax. Also we have Physic-lab work every Tuesday, AutoCAD-lab work every Wednesday and Fortran-lab work every Friday. We visit our library to study and to find books that we need in our projects or in our subjects. In this semester we have a lot of interesting subjects, such as the Science of materials and to a lot of computer programs. My favorite subjects this semester are the Science of materials and the programming.

My timetable

This semester my timetable is very strained. I have lessons 25 hours per week.  Every morning starts my lessons at 9a.m o'clock and ends at 6p.m. I have six lessons which are English for academic perposes,programming, materials,mathematic,physics and Autocad program. Every class lasts one and a half hour.we use to have 3 breaks  every day between lessons. The most interesting lesson is Autocad because we learn how  to desing many thing. It's very stressfull semester because we have got final exams for all the courses!!